 |
Saturday 28 September 2013
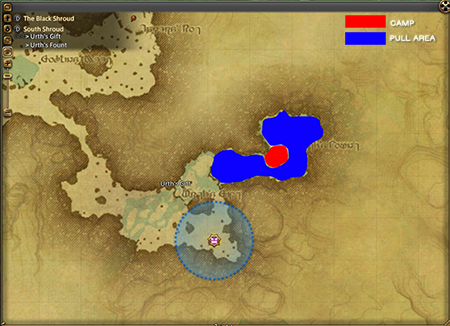
Level 46-50 Urths Fount

Requirements/Notes:
* Best to have a puller (Ranger)
* Good to have a BLM for AoE Sleep in case of Links
Target mobs:
Primary: Lv50 Water Sprite
* Non Aggro / Link (Unknown)
Secondary: Lv47 Ked
* Aggro / Link
Tertiary: Lv47 Lesser Kalong
* Non Aggro / Link (Unknown)
Level 35-40 The Ogres Belly (Coerthas)

Requirements/Notes:
* Best to have a puller (Ranger)
* Need to Alternate Pulls from A & B Rooms
* Good to have a BLM for AoE Sleep in case of Links
Target mobs:
Primary: Lv39 Taurus
* Aggro / Link
Secondary: Lv38 Will 'o' the wisp
* Non Aggro
Level 15-20 Western Thanalan (Moondrip)


Requirements/Notes:
* Best to have a puller (Ranger)
* 1 or 2 THM for AoE Blizzard II
Target mobs:
Primary: Lv24 Moondrip Piledriver / Blastmaster
* Aggro / Link
Secondary: Lv23 Laughing Toad
Ideal Party:
2 x THM
1x WHM
1x CNJ
1x PLD
1x WAR
1x RNG
1x Random DPS
Level 11-16 Nine Ivies (East Shroud)


Requirements/Notes:
* Best to have a puller (Ranger)
* 1 or 2 THM for AoE Blizzard II
Target mobs:
Primary: Lv18 Wolf / Boar Poacher
* Aggro / Link
Secondary: Lv18 Lemur
* Non Aggro / Link
Tertiary: Lv18 Boring Weevil
* Non Aggro / Link
Ideal Party:
2 x THM
1x WHM
1x CNJ
1x PLD
1x WAR
1x RNG
1x Random DPS
Friday 27 September 2013
EXP Parties: The Basics
- Location
Sometimes referred to as "base", "base camp", or "camp".The location is where you and your party will set up shop. The ideal location has mobs that: - Are 3-5 levels higher than the party
- Continuously spawn
- Do not use abilities like Sleep, Sleepga, Bind, or otherwise not dispellable by the healer or other supporting class.
- Will not aggro the party when spawned
- The location itself should be within a reasonable distance from a aetheryte or other means of transportation and a repair vendor.
- It is safe to say, not every location will have these criteria, but it is helpful to understand what makes a location great for your and your party.
- Party Roles:
- Tank
- Healer
- Damage Dealer (DD)
- Puller
- Party Role Responsibilities:
- Puller - The puller is typically a ranged class. The puller is responsible for keeping mobs coming in at a pace consistent with, or just ahead of, the rate of killing. This ensures that each kill stays in under the exp chain timer. The puller is also responsible for knowing which mobs to pull, and how far away he can pull from before the mob resets. The puller must know how to avoid mobs that will aggro (by knowing that mob's aggro radius) and how to avoid damage on the return to camp.
- Tank - The tank gets to tank as usual with one exception: the tank does not initiate the fight. The fight initiation is left to the puller and upon the puller's return, taunts the mob off. In some cases, the party might have another mob "on deck" or next to the party, CC'd (e.g. sleep). The tank would be the first to initiate the attack on this mob in this case after the initial mob is dead or near death.
- Damage Dealer - Simply put, the damage dealer's biggest responsibility is to not be a dick and not take damage. The DD should maintain a high level of damage output while taking care not to steal hate (aggro/threat) from the mob. The DD should be mindful of their position to the mob and the mob's special abilities. If the DD is taking damage it should be for the rare emergency taunt off the tank to prevent tank death; all other instances should be avoided. The DD might also be asked to CC a mob to be placed on deck.
- Healer - The healer has a shifting priority depending on an active pull or not. If the puller is about to pull, the priority is: Puller> Healer > Tank > DD. If the pull is done, the priority shifts to: Tank> Healer > Puller > DD. Dispels are always secondary to heals unless on the puller on an active pull. The healer should also be mindful of pulling hate from either the puller or the tank. The healer might also be asked to CC a mob to be placed on deck. The healer should also be dead sexy.
Please see guide on being an awesome party member: http://www.reddit.com/r/ffxiv/comments/1kpl3m/guide_performing_effectively_in_a_party/
Campsite Testing
If you would like to contribute your findings of camps, and their
viability for EXP camping at various level ranges, please add them here:
Data Gathering Part 1 (http://goo.gl/thRE7v)
Data Gathering Part 1 (http://goo.gl/thRE7v)
Mechanics of the Pull
Party with a strong and low cool down CC
- Start - Be sure to make sure everyone is ready
- The Pull - The healer positions close to the end of the party location, sometimes stepping outside of the immediate location, so they can heal the puller as soon as possible while not losing sight of the rest of the party, especially the tank. This is typically only done for strong mobs, mobs that are capable of killing the puller, or mobs that have a sleep or bind.
- The Handoff/The Exchange - The tank taunts to pick the mob up from the puller.
- Tank Positioning/Rotation and DPS Start - The tank rotates the mob so that the mob is facing towards the outside of the party location. This is to help prevent DD gibbing and to prepare for the secondary pull.
- Secondary Pull - at a certain %, the puller will pull a secondary mob. With a CC in the party, this can be done around 60%. It can be higher or lower health % depending on the strength of the DD in the party.
- The CC - A strong CC on the secondary mob is cast by one of the DDs. All DDs are responsible for making sure to not break the CC and/or help to ensure the mob stays CC'd.
- Second mob readied - When mob 1 is nearing death, the tank should taunt the second mob. This taunt occurs in the sweet spot between mob 1 death and mob 2 stronger attacks. The tank should be aware of how hard the mob is hitting and blow a secondary cool down or plan accordingly so as to not take too much damage for the healer(s) to heal through.
- Mob 1 death - After mob 1 dies, and only after mob 1 dies, all DPS switch to mob 2. The tank should have sufficient threat at this point. The puller then repeats appropriately, being sure to gauge everyone's mana and other resources.
Party without a CC
The biggest difference between a party with a CC and without is when the secondary pull happens. Without a CC, you do not want 2 mobs beating up on your tank if they are especially tough. Teamwork, communication, and observation are key.
- Start - Be sure to make sure everyone is ready
- The Pull - The healer positions close to the end of the party location, sometimes stepping outside of the immediate location, so they can heal the puller as soon as possible while not losing sight of the rest of the party, especially the tank. This is typically only done for strong mobs, mobs that are capable of killing the puller, or mobs that have a sleep or bind.
- The Handoff/The Exchange - The tank taunts to pick the mob up from the puller.
- Tank Positioning/Rotation and DPS Start - The tank rotates the mob so that the mob is facing towards the outside of the party location. This is to help prevent DD gibbing and to prepare for the secondary pull.
- Secondary Pull - The secondary pull in this case happens when mob 1 is @~30%. Making sure to notice how fast mobs are being DD'd. The tank rotates the mob so that the mob is facing towards the outside of the party location. This is to help prevent DD gibbing and to prepare for the secondary pull.
- Secondary Pull - The secondary pull in this case happens when mob 1 is @~30%. Making sure to notice how fast mobs are being DD'd. The tank rotates the mob so that the mob is facing towards the outside of the party location. This is to help prevent DD gibbing and to prepare for the secondary pull.
- Mob 2 Exchange - In this case, without a CC, the tank no choice when to pick up the mob 2. The tank must pick up mob 2 once the puller comes within range lest the puller die. A good tank and puller tandem will understand this and coordinate effectively, with the puller kiting if necessary.
- Tank Positioning/Rotation and DPS Start again - The tank rotates the 2nd mob into the fold. No DD should attack mob 2 until mob 1 is dead.
- Mob 1 death - After mob 1 dies, and only after mob 1 dies, all DPS switch to mob 2. The tank should have sufficient threat at this point. The puller then repeats appropriately, being sure to gauge everyone's mana and other resources.
Theory Crafting


Base XP Per Kill: 200
Seconds Per Kill: 15
XP Per Hour: Aprox. 69k XP per hour
Base XP Per Kill: 200
Seconds Per Kill: 10
XP Per Hour: Aprox. 106k XP per hour
Base XP Per Kill: 300
Seconds Per Kill: 15
XP Per Hour: Aprox. 104k XP per hour
Ideal Party:
1 PLD (Main Tank with Provoke for oh shit moments)
1 WAR (For Add Pickup and Management)
1 WHM (Main Heal)
1 SCH (Secondary Healer)
3 DPS (Mixed Bag )
1 Ranger for Pulling
Subscribe to:
Posts (Atom)